Since David and I started dating, we've both talked about getting a gear room started. One wedding, four years and four houses later, we finally built one in Italy! Having lived in Alaska practically my whole life, I never had access to an IKEA until now(I think the only reason I knew what it was, was from watching Fight Club). We finally went for the first time a couple months back, and proceeded to go back every weekend of that month until we got the house set up(Italian houses don't really do closets/cabinet space, or so we've found). This was actually a fun project for me! And with an overall cost(not including the tools) UNDER €200, it was definitely worth it!
 |
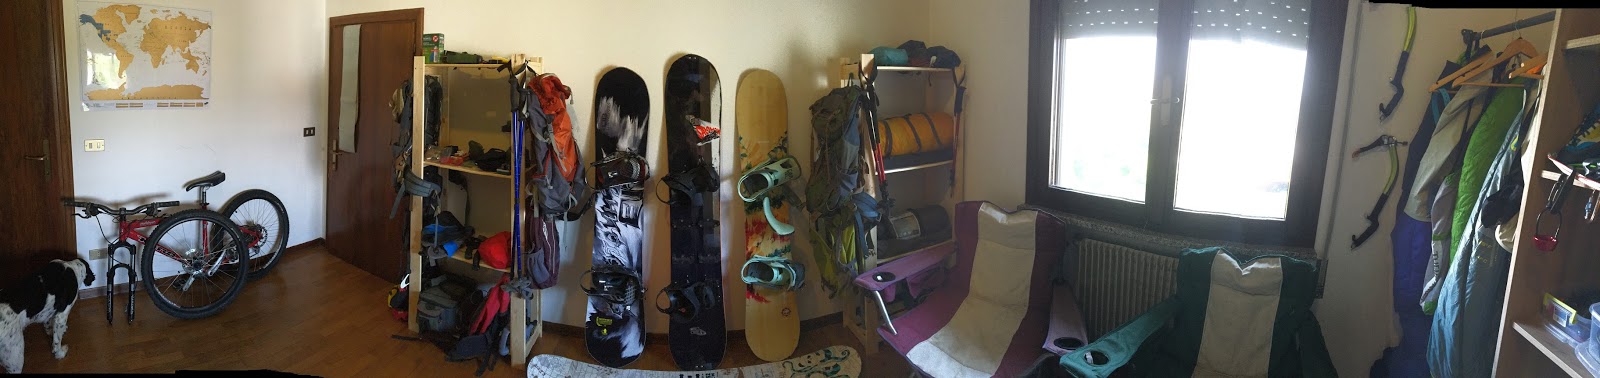
| Gimli stayed still enough for a panorama! |
 Supplies/Tools Needed
2-Besta Book Cases(60X40X192cm) €50 each
8-Besta shelves(56X36cm) €5 each
2-Komplement shelves(100X35cm) €10 each
 2-Komplement Clothes Rails(100cm) €3 each
2-Albert shelving units(64X28X159cm) €13 each
1-4 pack of Blecka hooks
-Screws of various sizes(this was more of an art that a science)
-Drill
-Tape measure
-Pencil
-Level(optional, who needs perfectly level shelves anyway?)
-Patience(I only wanted to quit twice!)
The Process
-I started by assembling the two Besta shelf units without putting any of the shelves in. I'm kicking myself now for not having taken any photos of my work in progress but oh, well. Hindsight 20/20.
-Next, I hung my Komplement shelves in between the two Bestas. There are no mounting holes on the outside of the Besta units, so this is where the drill comes in handy(just make sure your drill bit is no larger than the shaft of the screw without the threads). I measured equal distances from the bottom of the outside of each of the Besta shelf units and penciled a straight line using one of the shelves as a straight edge.
-I marked the straight, pencil line where to drill by placing the Komplement shelf in line with my mark and eyeballing where the screw holes were(art not science, remember?).
 |
| Lining up the shelf to mark the drill holes |
 |
| Pencil mark on the inside of the right besta |
-Next, I marked the center up the besta units, a couple inches from the top to hang the Clothing rail hardware.
-Since the area that I was setting up my shelves was close to a wall, I attached another clothing rail from the left Besta unit directly to the wall for additional hanging space.

-We hung the Blecka hooks on the outside of the right Besta unit to hang our most commonly used packs.
-The two Albert shelving units stand alone, so assembly was pretty easy. I attached screws to the outside of the units to hang packs and such.
-And finally, we put a long piece of cardboard(temporary) over the Besta units so that we could lay our sleeping pads out on top.
The End Product:
 |
| Finished and gear hung! |
 |
| The Albert units |
 |
| Lawn chairs because who wouldn't want to sit in a gear room like this? |
 |
Thoughts:
I LOVE how customizable this all was! We're are definitely going to continue to add to this setup. Since we've started getting into climbing so much, we'll probably have to make a workbench with a peg board to hang our rack.
Down the road, we will probably replace the Albert units with something more sturdy and overall better quality. They work great for now(and didn't make us cry when we swiped the credit card), but they're just not what I have in mind longterm.
This took me a slow day to set up and hang/arrange our gear on, but it could probably be done in a couple hours. All in all, I'd say 'decluttering' our piles of gear is definitely worth the(under €200!) price tag and it looks pretty sweet on display like this!
No comments:
Post a Comment